Configuring Server-to-Server Sharing
ownCloud 7 introduces a powerful new feature, server-to-server sharing. With just a few clicks you can easily and securely create public shares for sharing files and directories with other ownCloud 7 servers. (Currently, this works only with OC7 and not older versions.) You can automatically send an email notification when you create the share, add password protection, allow users to upload files, and set an expiration date.
Follow these steps to create a new public share:
- Go to the Admin page and scroll to the Remote Shares section.

2. To enable server-to-server sharing, and to allow remote users to mount your shares in their ownCloud 7 accounts, check Allow other instances to mount public links shared from this server. Leaving the checkbox blank disables server-to-server sharing.
3. You can enable the users on your local ownCloud server to mount public link shares by checking Allow users to mount public link shares. When this is not checked your users cannot mount public link shares, though they can view and download them.
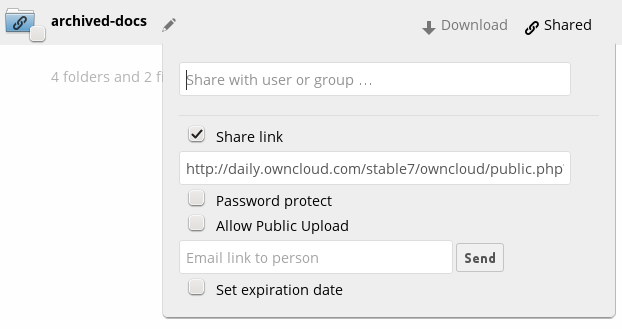
4. Now go to your Files page and hover your cursor over the file or directory you want to share to expose the administration options. Check the Share Link checkbox to create the share, and to expose all of your sharing options.

Your new public share is labeled with a chain link. If you do not protect it with a password, it is visible to anyone who has the URL. Users on other ownCloud 7 servers can mount it and use it just like any ownCloud share.
Un-check the Share Link checkbox to disable the share.
See “Using Server-to-Server Sharing” in the Users Manual to learn how to connect to a remote public share.
Notes
Your Apache Web server must have mod_rewrite enabled, and you must have trusted_domains configured in config.php. Consider also enabling SSL to encrypt all traffic between your servers. (See “Manual Installation” in the Administrators Manual to learn more about mod_rewrite, SSL, and alternative HTTP servers. See “Installation Wizard” in the Administrators Manual to learn more about configuring trusted domains.)
Your ownCloud server creates the share link from the URL that you used to log into the server, so make sure that you log into your server using a URL that is accessible to your users. For example, if you log in via its LAN IP address, such as http://192.168.10.50, then your share URL will be something like http://192.168.10.50/owncloud/public.php?service=files&t= 6b6fa9a714a32ef0af8a83dde358deec, which is not accessible outside of your LAN. This also applies to using the server name; for access outside of your LAN you need to use a fully-qualified domain name such as http://myserver.example.com, rather than http://myserver.